Wednesday, 6 November 2013

OWA Configuration for SharePoint 2013.

Install the OWA server set up first. Once done open the Windows power-shell with elevated permission (Run as administrator)

The below command will create new farm structure of OWA and you can use this in your application such as SharePoint, Lync and etc. Here I used the OWA with my SharePoint application.

> New-OfficeWebAppsFarm –InternalURL "http://owa" -ExternalURL "http://owa.scshiva.com" –AllowHttp -EditingEnabled

the above command will show the below as output:

FarmOU                           :
InternalURL                     : http://owa/
ExternalURL                     : http://owa.scshiva.com/
AllowHTTP                       : True
SSLOffloaded                     : False
CertificateName                 :
EditingEnabled                   : True
LogLocation                     : C:\ProgramData\Microsoft\OfficeWebApps\Data\Logs\ULS
LogRetentionInDays               : 7
LogVerbosity                     :
Proxy                           :
CacheLocation                   : C:\ProgramData\Microsoft\OfficeWebApps\Working\d
MaxMemoryCacheSizeInMB           : 75
DocumentInfoCacheSize           : 5000
CacheSizeInGB                   : 15
ClipartEnabled                   : False
TranslationEnabled               : False
MaxTranslationCharacterCount     : 125000
TranslationServiceAppId         :
TranslationServiceAddress       :
RenderingLocalCacheLocation     : C:\ProgramData\Microsoft\OfficeWebApps\Working\waccache
RecycleActiveProcessCount       : 5
AllowCEIP                       : False
ExcelRequestDurationMax         : 300
ExcelSessionTimeout             : 450
ExcelWorkbookSizeMax             : 10
ExcelPrivateBytesMax             : -1
ExcelConnectionLifetime         : 1800
ExcelExternalDataCacheLifetime   : 300
ExcelAllowExternalData           : True
ExcelWarnOnDataRefresh           : True
OpenFromUrlEnabled               : False
OpenFromUncEnabled               : True
OpenFromUrlThrottlingEnabled     : True
AllowHttpSecureStoreConnections : False
Machines                         : {OWAServer}


_ _ _ _ _ _ _ _ _ _ _ _ _ _ _ _ _ _ _ _ _ _ _ _ _ _ _ _ _ _ _ _ _ _ _ _ _ _ _ _ _ _ _ _ _ _ _ _ _ _ 

Now login to SharePoint 2013 server:

_ _ _ _ _ _ _ _ _ _ _ _ _ _ _ _ _ _ _ _ _ _ _ _ _ _ _ _ _ _ _ _ _ _ _ _ _ _ _ _ _ _ _ _ _ _ _ _ _ _ 

1. Open the SharePoint Powershell with elevated permission (Run as administrator).

2. Execute the below command one by one.


> New-SPWOPIBinding -ServerName OWAServer.scshiva.com  -AllowHTTP

The above command will give multiple line as a output. Then execute the below commands one by one.


> Get-SPWOPIZone
OutPut: internal-https

If the above shows the https then need to execute the Set-SPWOPIZONE command. If the above out put is http then skip the next 2 steps.

> Set-SPWOPIZone -zone "internal-http"
> Get-SPWOPIZone
internal-http

> (Get-SPSecurityTokenServiceConfig).AllowOAuthOverHttp
OutPut: False

If the above output is "False" the run the next set of command.
> $config = (Get-SPSecurityTokenServiceConfig)
$config.AllowOAuthOverHttp = $true
$config.Update()

Run the below command to confirm the status is True.
> (Get-SPSecurityTokenServiceConfig).AllowOAuthOverHttp
OutPut: True

Post your quires in the below. :-)

Tuesday, 15 October 2013

Administration on HNSC URL

Earlier we discussed about HNSC Concept and How to create HNSC in SharePoint. To know that click here

In this post I am explaining how to manage(Add/Remove) the URL of HNSC.

Add URL for HNSC site.

To view the existing URL's and its zone use the below command.

Get-SPSiteURL -Identity "http://FirstSiteCollection.SharePointShiva.com"

Note the output and Use the below command to add the new URL in existing site collection

Set-SPSiteURL -Identity "http://FirstSiteCollection.SharePointShiva.com" - Url  http://addingnewurl.SharePointShiva.com -Zone "custom"

The above command will add the new url called addingnewurl.sharepointshiva.com to the existing site collection which contain the url called firstsitecollection.sharepointshiva.com

Don't forget to mention the ZONE.

- - - - - - - - - - - - - - - - - - - - - - - - - - - - - - - - - - - - - - - - - - - - - - - - - - - - - - - - - - - 

Remove the URL of HNSC.

Remove-SPSiteURL -Identity http://firstsitecollection.sharepointshiva.com

Post your query in comment.

Host Name Site Collection Concept (HNSC) - SharePoint

In the post we are going to know about Host Name Site Collection concept.

What is Host Name Site Collection?
Host Name is referring a identity for the computer in general. The URL of web application in SharePoint will be "<http(or)https>://HOSTNAME:PORT" eg: http://sharepointwebserver:2204.

In this web application we can create one site collection in root level and that can access using the above mentioned URL or some other alternate access mappings url in SharePoint.

In my scenario I need to have 9 site collections in one web application and each site collection should have its unique url (No Managed Path).

Then my minds arise a question I can have 5 URL's in SharePoint but all the 5 will access the one site collection which I created in ROOT. To achieve the requirement we need to choose the HNSC concept in SharePoint. The below example and syntax shows how to create a site collection using HNSC concept.

For getting the syntax and description for options in the syntax click here

Example: New-SPSite -Url "http://FirstSiteCollection.SharePointShiva.com" -OwnerAlias SharePointShiva\SPHNSCAdmin -ContentDatabase WSS_Conent_HNSC1stSC -HostHeaderWebApplication http://sharepointwebserver:2204 -Name FirstSiteCollectionUsingHNDCConcept -Template STS#0

In the above mentioned powershell command have list of option and check the description below.

-URL : Provide the SiteCollectionURL which required this will be similar to ROOT.
-HostHeaderWebApplication : Provide the WebApplication URL in this Option so that that the site collection will create under the web application.
-Template : Mention the template code here to create the SC with the corresponding template to know more template click here

Soon I will post about how to set the another URL for the HNSC and how to remove the URL.. Stay Tuned.

Tuesday, 17 September 2013

Changing the Recovery model to SIMPLE for multiple database in a single Query: MSSQL Server

If you executed the below query then you will get the output of another query which you need to execute to change the Recovery model from Full to Simple.

Query:
set nocount on go select 'ALTER DATABASE [' + name + '] SET RECOVERY SIMPLE' from sys.databases where database_id > 6 and recovery_model_desc = 'FULL'

Output:
ALTER DATABASE [DB1] SET RECOVERY SIMPLE
ALTER DATABASE [DB3] SET RECOVERY SIMPLE
ALTER DATABASE [DB6] SET RECOVERY SIMPLE
ALTER DATABASE [DB7] SET RECOVERY SIMPLE
ALTER DATABASE [DB9] SET RECOVERY SIMPLE


Note:  The SQL Server have around 15 database and the DB 1,3,6,7,9 only running in Full recovery model. So that you will got the above output copy it and executed like the below.

Query:
Use Master
ALTER DATABASE [DB1] SET RECOVERY SIMPLE
ALTER DATABASE [DB3] SET RECOVERY SIMPLE
ALTER DATABASE [DB6] SET RECOVERY SIMPLE
ALTER DATABASE [DB7] SET RECOVERY SIMPLE
ALTER DATABASE [DB9] SET RECOVERY SIMPLE

Once the above executed successfully please cross verify it randomly by manual check. Now all the database in the SQL server will set to Simple recovery model.

Note:
If the recovery model is in Simple mode then you can't recover the database fully.

Thanks!!!

Monday, 16 September 2013

Authentication window is continuously appear and not accepting the credentials, FMI: Event ID: 6037

Source: LsaSrv
Type: Error
Description:

The program svchost.exe with the assigned process ID 4224 could not authenticate locally by 
using the target name HTTP/website.domain.com 
The target name used is not valid. A target name should refer to one of the local 
computer names for example the DNS host name.

Try a different target name.

The below settings should fix the above issue.

Go to Run and type "REGEDIT"

It will open the registry editior. and add the below value in the corresponding location.

HKLM\system\CurrentControlSet\Services\Lanmanserver\parameters
DisableStrictNameChecking:DWORD=1

HKEY_LOCAL_MACHINE\SYSTEM\CurrentControlSet\Control\Lsa
DisableLoopbackCheck:DWORD=1

The server must be restarted for the settings to take effect. See ME896861 for details about these 
registry settings.

Friday, 13 September 2013

Install Workflow Manager 1.0 Offline

If you want to install Workflow Manager 1.0 on servers without internet connectivity, you will run into problems with the Web Platform Installer, the only tool Workflow Manager 1.0 can be installed with.
The good news is, there is a command line tool of Web Platform Installer, where you can download the installation files and all of its dependencies to a internet accessible machine, move it over to one of your servers and install it in offline mode.
Take the following steps to do so:
  1. Download the WebPICMD.exe Package from the MS Downloadcenter and unzip it to a folder (C:\WebPICMD\WebPICMD.exe in our case)
  2. Open a Command Prompt, navigate to the folder you extracted the tool and execute the following command:

    "WebpiCmd.exe /Offline /Products:WorkflowManager /Path:D:\Temp\WorkflowManager\"
    This will initiate a download with all the related components into the provided folder.
  3. Copy the WebPICMD.exe to the server where you want to install the WorkflowManager 1.0, in our example to D:\Temp\WebPICMD\WebPICMD.exe
  4. Copy the downloaded files to your server where you want to install the WorkflowManager 1.0, in our example to D:\Temp\WorkflowManager 
  5. Open a Command Prompt, navigate to the folder you copied the WebPICMD.exe tool and execute the following command:
WebPICMD.exe /Install /Products:WorkflowManager
/AcceptEULA /SuppressReboot
/Log:./WorkflowManager.log /Xml:file:///D:\Temp\WorkflowManager\feeds\shadow-webproductlist.xml

This will initiate the installation of the Workflow Manager 1.0 and its dependencies. The outcome of the installation will be logged to the WorkflowManager.log file. The above line will suppress reboots and will accept the license terms automatically.
A log file will be created at the following path, where you can see the process and the warnings/errors/information about the installation:
%localappdata%\microsoft\web platform installer\logs\webpicmd
Stay tune to catch the configuration wizard of Workflow Manager. (Standalone and Farm).
Thanks.

Install and Download SharePoint 2013 prerequisites offline (manually)

This article applies in a situation when you don’t have internet access in your SharePoint server.

I have placed all the direct download links for the installers you might need.

This article assumes you are having a new fresh installation of windows server 2008 R2 SP1
If you tried to run the installer , The following should be installed (but you cant install them directly from here since you don’t have internet)


in this case  you can download and install SharePoint 2013 Prerequisites offline and run them manually as below:

I have placed what needs to be installed on a clean Window server 2008 R2 SP1 , you should not need more than this:


Click the each prerequisite it will redirect you to the page where the software need to Download.

Prerequisite:

  1. Microsoft .NET Framework 4.5
  2. Windows Management Framework 3.0
  3. Microsoft SQL Server 2008 R2 SP1 Native Client
  4. Windows Identity Foundation (KB974405)
  5. Windows Identity Extensions
  6. Microsoft Sync Framework Runtime v1.0 SP1 (x64)
  7. Windows Server AppFabric
  8. Microsoft Information Protection and Control Client
  9. Microsoft WCF Data Services 5.0
  10. Cumulative Update Package 1 for Microsoft AppFabric 1.1 for Windows Server (KB2671763)
Once you downloaded all the above mentioned prerequisites, Install the .Net Framework 4.5 and Windows Management Framework 3.0 Manually.

Yes you can install all the above prerequisites manually except AppFabric. If you are installing manually it required do some configuration. That is not required for SharePoint.

So once the First 2 prerequisites installed successfully now you need to follow the below simple steps.

My SharePoint 2013 software dump is available in the following path for an example.D:\Software\split\SharePoint\.

Place the downloaded software to prerequisiteInstallerFiles folder which present inside the SharePoint dump.

Then open the Windows PowerShell with elevated permission (Run As Administrator).

Execute the below powershell command. It will install all the softwares including appfabric without an issue.


$SharePoint2013Path = "D:\Software\split\SharePoint\"

Start-Process "$SharePoint2013Path\PrerequisiteInstaller.exe" –ArgumentList "/SQLNCli:$SharePoint2013Path\PrerequisiteInstallerFiles\sqlncli.msi /IDFX:$SharePoint2013Path\PrerequisiteInstallerFiles\Windows6.1-KB974405-x64.msu /IDFX11:$SharePoint2013Path\PrerequisiteInstallerFiles\MicrosoftIdentityExtensions-64.msi /Sync:$SharePoint2013Path\PrerequisiteInstallerFiles\Synchronization.msi /AppFabric:$SharePoint2013Path\PrerequisiteInstallerFiles\WindowsServerAppFabricSetup_x64.exe /KB2671763:$SharePoint2013Path\PrerequisiteInstallerFiles\AppFabric1.1-RTM-KB2671763-x64-ENU.exe /MSIPCClient:$SharePoint2013Path\PrerequisiteInstallerFiles\setup_msipc_x64.msi /WCFDataServices:$SharePoint2013Path\PrerequisiteInstallerFiles\WcfDataServices.exe"

Thanks.


Thursday, 22 August 2013

Item was not crawled because of a password change. Update password and retry crawling.

Recently i changed my service account password and updated the same in the following areas

1. Central Admin -> Managed Account
2. IIS -> Application Pool Identity
3. Services.msc -> If Search Service running service account.

but my search crawl history says "Item was not crawled because of a password change. Update password and retry crawling". Searched a lot and come to knew require to update the password separately in Default Content Access account.

To access the Default content access account use the following links.

Central Adminstration -> Manage Service Applications -> Search Service.

In the search service page. Look on the left top pane you have link called "Search Service Administration". Choose that and it opens a new page. In that we have a option called default content access account.

Thanks.

Tuesday, 13 August 2013

Difference between Explicit and Wildcard Inclusion in SharePoint

Recently i heard from one my friend who playing SharePoint developer role. He asked what is mean by explicit inclusion. What is the purpose of it and how it works. And they knew only wild card inclusion managed path and they thought that is the one which available in SharePoint.

With this experience i would like to share the information about explaining the managed path and its uses in SharePoint.

What's in a SharePoint Managed Path?

I often hear and sense confusion about SharePoint managed paths. Managed paths are essentially 'mount points' for site collections. 

There are two types of managed paths available in SharePoint.
- Explicit 
- Wildcard. 

What's the difference between an explicit managed path and a Wildcard managed path? 

By default, the root ‘/’ managed path is explicit, meaning only one site collection can be in it and it assumes the identity of the managed path. That's how you browse to http://servername:port and get a Web page. A Web application without a site collection in the root managed path will return a 404 error when browsing to the root. You could always create another explicit managed path for multiple portal support in a Web application, i.e. http://servername:port/HR. HR is a peer to '/'. Now, you can no longer have an HR sub-site in the root - you will get a security validation error because the URL space is already taken.

A Wildcard managed path is basically 180 degrees in the opposite direction. A Wildcard managed path can support hundreds or thousands of site collections, but they are appended to the managed path, like http://servername:port/sites/team, with sites being the Wildcard managed path. It will always return a 404 error when browsing directly to a Wildcard managed path. But, you can create many Wildcard MPs like teams or projects.  Wildcard managed paths are like a sorting mechanism for site collections.

I hope this helps your Web application structure and design.

Thursday, 8 August 2013

Run all Health Analysis Jobs on Demand

Following an installation, nothing gives me more joy (pertaining to SharePoint anyway) than having a clean Health Report days after my installation (AKA: Review Problems and Solutions). Recently though, I was doing an installation and I decided to try to “force run” the health rules rather than wait for them to run.
Found this in PowerShell to run all the jobs on demand:
$jobs = Get-SPTimerJob | Where-Object {$_.Title -like "Health Analysis Job*"}
foreach ($job in $jobs)
{
  $job.RunNow()
}

SharePoint Server 2010 Service Pack 2 Updated

It is recommended to install June 2013 CU before SP2. June 2013 CU might not correctly identify the SP2 baseline. If SP2 has already been installed and June CU does not install you need to wait for August CU which will correctly identify the SP2 baseline.
Guess it wasn’t such a smart installer after all was it?
Let’s take a look at the version numbers based on installation order:
  • SP2 only - 14.0.7015.1000
  • June CU only - 14.0.7102.5004
  • SP2 then June CU - 14.1.7015.1000
  • June CU then SP2 - 14.1.7102.5004
Based on the original guidance from MS, you might be running the June 2013 CU baseline, but your build version will still show as SP2.

SharePoint 2013 New Feature Reference

This can be used as a quick reference for custom meetings or just yours to have on hand.
Requirements:
  • Minimum OS: Server 2008 R2 SP1
  • Minimum SQL: 2008 R2 SP1
  • Supports SQL and Server 2012
  • CPU: 4 Cores
  • RAM: 12GB (3-tier farm deployment)
General Info:
  • DB Attach only upgrade method
  • BDC, MMS, UPA, Secure Store, Search support DB attach upgrade
  • Site collection level upgrade supported. DB is upgraded but site collection stay 2010 until testing is complete. Not just visual upgrade
  • Web analytics now integrated with search. No longer its own SA
  • Office Web Apps now its own separate scalable server farm product that SP consumes
  • New Service Apps:
    • App MGMT Service
      • Manage SP app licensing and permissions
    • Work MGMT Service
      • Aggregate and synchronize tasks between multiple environments, such as Project Server, Exchange and SharePoint.
    • Translation Service:
      • On the fly translation from 1 language to another
  • Supports PowerShell 3.0 and .Net 4.x Framework
  • Claims based authentication is the default (classic mode can still be implemented via PowerShell)
  • FAST Search is now baked in.
  • User Profile Service has a new 1 way AD import mode. Full 2 way FIM UPS stays the same and is still available
SQL:
  • SQL has always on HA/DR and improved I/O with SP 2013
  • 7 DB have been deprecated in SP 2013
    • 4 Project related DBs
    • Search Property
    • 2 Web Analytics DBs
  • 5 New databases
    • Project Service
    • Search Service Application Links Store Database Library
    • Search Service Application Analytics Reporting Store Database
    • App Management Service Database
    • Translation Service Database

Converting SharePoint website from Classic to Claims based Authentication


$App = get-spwebapplication “URL”

$app.useclaimsauthentication = “True”

$app.Update()

Example:-
$App = get-spwebapplication “http://sp1:5000”

$app.useclaimsauthentication = “True”

$app.Update()

UserName showing up as DomainName\UserName instead of Full Name in SharePoint

UserName showing up as DomainName\UserName instead of Full/Display Name in SharePoint.

Solution 1 : 
  • Set-SPUser -Identity ‘scs\shiva4224’ -DisplayName ‘Shivashankaran S C’ –Web http://algorithm
  • Get-SPUser –Web http://algorithm | Set-SPUser –SyncFromAD
FOR ALL USERS : Get-SPUser –Web http://algorithm | Set-SPUser –SyncFromAD

Solution 2 :
 1. Opened Central Administration on SharePoint 2010, logged in as the Administrator.
2. Clicked into "Application Management," then "Manage Service Applications."
3. Scrolled down to "User Profile Service Application," and clicked to open that.
4. Clicked "Manage User Profiles" under the main People heading.
5. Searched for the account I was looking for - "shiva" - and made the changes like first name, last name, and full name were showing.
6. Saved - and now I'm hoping for the best. With SharePoint 2010 it took up to 15 minutes without IIS Restart to become available; we'll see with SharePoint 2013.

Powershell Commands for Installing Solutions and Features in SharePoint.

Earlier i discussed about how to add the solution (WSP) to the SharePoint. In the continuation now i am going to explain how to install (Deploy) the solution to the concern web application.

After that how to enable or disable the feature through powershell.

To know about adding solution in SharePoint Click Here.

Installing the Solution

After adding a solution definetly we need to deploy the solution to web application. To do that we have command called Install-SPSolution. Syntax and Example are provided below for your understanding.

SYNTAX
    Install-SPSolution [-Identity] <SPSolutionPipeBind> [-AllWebApplications <S
    witchParameter>] [-AssignmentCollection <SPAssignmentCollection>] [-CASPoli
    cies <SwitchParameter>] [-Confirm [<SwitchParameter>]] [-Force <SwitchParam
    eter>] [-GACDeployment <SwitchParameter>] [-Language <UInt32>] [-Local <Swi
    tchParameter>] [-Time <String>] [-WebApplication <SPWebApplicationPipeBind>
    ] [-WhatIf [<SwitchParameter>]] [<CommonParameters>]

    Install-SPSolution [[-Identity] <SPSolutionPipeBind>] -Synchronize <SwitchP
    arameter> [-AssignmentCollection <SPAssignmentCollection>] [-Confirm [<Swit
    chParameter>]] [-Language <UInt32>] [-WhatIf [<SwitchParameter>]] [<CommonP
    arameters>]

Example:

Install-SPSolution –Identity recruitment.wsp –WebApplication http://myrecruitmentsite -GACDeployment

Note: You can also use the following parameters
                     –CASPolicies: If you are not deploying to the GAC
                     –AllWebApplications: if you want to deploy the solution to all web applications
                     –Force: to force the deployment of the solution
                     -GACDeployment: It will place the DLL files to the Assembly folder in Windows directory.

Updating the Solution in SharePoint
Without redeploying the solution you need to overwrite the solution with some changes in the code level means, we can use Update-SPSolution. The example are provided below.


Update-SPSolution –Identity recruitment.wsp –LiteralPath E:\solutions\recruitment.wsp –GACDeployment

Uninstalling the Solution from SharePoint

This command will just retract your solution from the specified web application. After executing the below command the mentioned web application can't use the feature which are bind with the solution.

Uninstall-SPSolution –Identity recruitment.wsp –WebApplication http://myrecruitmentsite

Removing the Solution from SharePoint

This command will completely remove your solution from the SharePoint server. Before executing this command the solution should be retracted from all the web application where it deployed.

Remove-SPSolution –Identity recruitment.wsp


Enable or Disable the Feature in SharePoint

The below command will help you to enable or disable the feature to the site level.

Enable-SPFeature –Identity RefertheBuddy –url http://myrecruitmentsite

Disable-SPFeature –Identity RefertheBuddy –url http://myrecruitmentsite

Thanks Guys for Watching this Blog. :-)

Monday, 29 July 2013

Enabling BLOB cache in SharePoint 2013

Some features of SharePoint 2013 need to enable the BLOB cache in SharePoint 2013 like Image Renditions.
Will share the post about image renditions soon.
This is easy…
  1. Open the web.config of your SharePoint web application
  2. Search for <BlobCache
  3. You will find the following line
    <BlobCache location=C:\BlobCache\14“ path=\.gif|jpg|jpeg|jpe|jfif|bmp|dib|tif|tiff|themedbmp|themedcss|themedgif|
    themedjpg|themedpng|ico|png|wdp|hdp|css|js|asf|avi|flv|m4v|mov|mp3|mp4|mpeg|mpg|rm|rmvb|wma|wmv|ogg|ogv|oga|webm|xap)$“ maxSize=10“ enabled=false />
4.   Change the enabled=false to enabled=true

Friday, 26 July 2013

Configuring my sites in SharePoint 2010 as well as 2013.

In this post we are going to discuss about how to configure the my sites from end to end. Each and every step will explain you clearly.

Before stepping into configuring my sites your environment should be fully configured with user profile service application. If you don't know the steps for configuring user profile service application please refer this link

Once user profile service is ready to use then why we need to wait lets go for configuring the my sites. The below steps are need to be done to achive the my sites configuration.

1. Web Application creation.
2. Site collection creation with My Site Host Template.
3. Setup mysites in User profile service application in SharePoint central administration.
4. Adding location as a wildcard inclusion in managed path of Web application.

Earlier i have post which explain about how to create web application and site collection in sharepoint using powershell command. So refer that to create those stuff. In site collection command you need to change the site collection template from blog to My site Host.

To go Web Application creation post please click here
To go Site Collection creation post please click here

In my scenario i created a web application in the port 4224 and site collection has been created in the ROOT with the template My Site Host.

After all the above stuff's go to user profile service application page in Central Administration -> Manage Service Application. Select the user profile service which you created and mapped with the web application.

Select setup my sites option in user profile service application like the below.


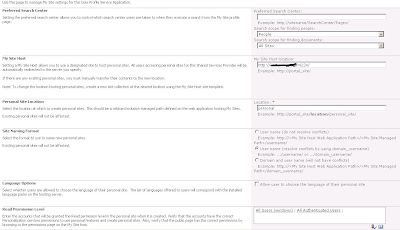
After selecting the above option it will open the page like below and update the information like below.


Once you updated the information click ok and  go to manage web applications page in central administration.

Select my site web application and choose managed path option. Then add the name as wildcard inclusion in managed path which you updated in location text box in setup my sites window.

Here i added personal as a wild card inclusion refer the below screen shot.


Once the managed path section then we need to enable the self site creation option in web application the below screen shot will explan the things.


Now we completed the mysite configuration. The big question is how to check the mysite in environment. who can we confirm whether the above effort are worth. Simple very simple task.

Select display name which showing in the right most top corner and select it. it will show the drop down box now you have option called "My site". Select it. It will redirect you to the web application which you created 10 mins before for my site.

If it is useful please respond the survey which available in right side of the post :-)

Thursday, 25 July 2013

MSSQL query for changing recovery model of all the databases in a server.

The below SQL query will help you to change the recovery model of all the databases in the server.

Recently i noted one of my development server is having 160+ databases and it occupied more than 600 gig space in HDD.

In development box no need of transaction log backup and every day full backup maintenance plan is running.

tried to change all the database recovery model to SIMPLE from Full or BULK LOGGED and the below script helped me. Hope it will help me in after sometime as well as you.


declare
@dbnm sysname,
@sql varchar(100)


-- Declare begin cursor to get the database names and get info from sys.databases catalog

declare cursor_db cursor
for select name from sys.databases where name != 'tempdb'

-- Using a cursor to loop through database names and change recovery model

open cursor_db
fetch next from cursor_db into @dbnm

--While Loop with Alter database command

while @@fetch_status = 0

begin

--print 'database is ' + @dbnm

set @sql='alter database ' + @dbnm + ' set recovery simple'
print 'sql is ' + @sql
exec (@sql)


fetch next from cursor_db into @dbnm
end

--clean up objects

close cursor_db
deallocate cursor_db

Thanks.

Rescan Disk Option Greyed Out | New Disks Not visible on Disk management | Update-HostStorageCache

  Recently I have added several LUN from NetApp Storage to Hyper-V servers. But in the disk management I couldn't see those new LUN. Exi...